Setup MESOS cluster on GCE
This is the first part of running a SMACK stack tutorial: Build Mesos cluster on GCE(Google Compute Engine), including Mesos master *3, slave *N, marathon and mesosDNS.
Linux Distribution: Ubuntu 14.04 LTS (Trusty Tahr)
Shell scripts for creating this cluster can be found on github: gce-mesos-cluster. The details explained in this article are summarized by these script, running sh create-mesos-cluster.sh will create this cluster.
A. Preparation
-
Install the Google Cloud SDK command line tool.
-
Know your current quota limits and decide the machine types in the cluster.
# Query the quota limits
$ gcloud compute project-info describe
$ gcloud compute regions describe asia-east1
...
- limit: 600.0
  metric: CPUS
  usage: 1.0
- limit: 200000.0
  metric: DISKS_TOTAL_GB
  usage: 410.0
...
-
In this tutorial, we are going to build a cluster with following specification:
role machine-type # of machines description master n1-standard-1 3 Mesos master & ZooKeeper slave n1-standard-4 4 with 300GB disk
B. Create VM instances
Use the following command to create a VM instance in GCE:
# create instance of mesos-master
gcloud compute --project "lab-larry" instances create "mesos-master-1" \
	--zone "asia-east1-b" --machine-type "n1-standard-1" \
	--network "default" --maintenance-policy "MIGRATE" \
	--scopes "https://www.googleapis.com/auth/cloud-platform" \
	--image "https://www.googleapis.com/compute/v1/projects/ubuntu-os-cloud/global/images/ubuntu-1404-trusty-v20151113" \
	--boot-disk-size "40" --boot-disk-type "pd-standard" --boot-disk-device-name "disk-mesos-master-1" \
	--metadata-from-file startup-script=./init-vm-instance.sh

# create instance of mesos-slave
gcloud compute --project "lab-larry" instances create "mesos-slave-1" \
	--zone "asia-east1-b" --machine-type "n1-standard-4" \
	--network "default" --maintenance-policy "MIGRATE" \
	--scopes "https://www.googleapis.com/auth/cloud-platform" \
	--image "https://www.googleapis.com/compute/v1/projects/ubuntu-os-cloud/global/images/ubuntu-1404-trusty-v20151113" \
	--boot-disk-size "200" --boot-disk-type "pd-standard" --boot-disk-device-name "disk-mesos-slave-1" \
	--metadata-from-file startup-script=./init-vm-instance.sh
To create 3 X masters and N X slaves, this script will do the job:
# create three masters with name: mesos-master-[1,2,3]
./utils.sh -c create-master -n mesos-master-1,mesos-master-2,mesos-master-3

# create four slaves with name: mesos-slave-[1,2,3,4]
./utils.sh -c create-slave -n mesos-slave-1,mesos-slave-2,mesos-slave-3,mesos-slave-4
C. Setup Mesos Cluster on VM instances
In utils.sh, we use --metadata-from-file startup-script=./init-vm-instance.sh to pass an initial script to install related software, here are detailed explainations:
- Install java & gcsfuse on all masters & slaves
To use Google Storage as a shared folder to faciliate installation, we need gcsfuse to mount Google Storage Bucket.
echo "Not installed opt software, proceed install..."
echo "INSTALL: mesos repo"
apt-key adv --keyserver keyserver.ubuntu.com --recv E56151BF
DISTRO=$(lsb_release -is | tr '[:upper:]' '[:lower:]')
CODENAME=$(lsb_release -cs)
echo "deb http://repos.mesosphere.io/${DISTRO} ${CODENAME} main" | tee /etc/apt/sources.list.d/mesosphere.list

echo "INSTALL: Java 8 from Oracle's PPA"
add-apt-repository -y ppa:webupd8team/java
apt-get update -y

# install oracle-java8 package without prompt
echo debconf shared/accepted-oracle-license-v1-1 select true | debconf-set-selections
echo debconf shared/accepted-oracle-license-v1-1 seen true | debconf-set-selections

apt-get install -y oracle-java8-installer oracle-java8-set-default

echo "INSTALL: gcsfuse - optional, using google storage to share installation packages."
export GCSFUSE_REPO=gcsfuse-`lsb_release -c -s`
echo "deb http://packages.cloud.google.com/apt $GCSFUSE_REPO main" | tee /etc/apt/sources.list.d/gcsfuse.list
curl https://packages.cloud.google.com/apt/doc/apt-key.gpg | apt-key add -
apt-get update -y
apt-get install -y gcsfuse
# create the shared folder
mkdir -p /opt/shared
- Install mesos package
ONLY For MASTER, install the mesosphere package
echo "INSTALL: for master, install mesosphere"
apt-get install -y mesosphere
ONLY For SLAVE, install the mesos package
echo "INSTALL: for slave, install mesos"
apt-get install -y mesos
- Configure ZooKeeper (on every Master node)
Two configuration files are required for ZooKeeper:
/etc/zookeeper/conf/myid : content of this file should be 1, 2, 3 for mesos-master-1, mesos-master-2, mesos-master-3
/etc/zookeeper/conf/zoo.cfg : content of this file
server.1=mesos-master-1:2888:3888
server.2=mesos-master-2:2888:3888
server.3=mesos-master-3:2888:3888
Use this script to setup these 2 files:
# ${HOSTNAME##*-}: get the last serial number(1,2,3) in $HOSTNAME. We have $HOSTNAME like "mesos-master-[1,2,3]"
echo ${HOSTNAME##*-} > /etc/zookeeper/conf/myid
echo "server.1=mesos-master-1:2888:3888" >> /etc/zookeeper/conf/zoo.cfg
echo "server.2=mesos-master-2:2888:3888" >> /etc/zookeeper/conf/zoo.cfg
echo "server.3=mesos-master-3:2888:3888" >> /etc/zookeeper/conf/zoo.cfg
- Configure Mesos Master service (on every Master node)
Four configuration files are required for mesos-master-service.
/etc/mesos-master/quorum : the minimum number for a node to win the election to be active master, set this to 2 since we have 3 masters.
/etc/mesos-master/ip : ip address of this master node.
/etc/mesos-master/hostname : hostname of this master node.
/etc/mesos/zk: the ZooKeeper’s service registry, content should be “zk://mesos-master-1:2181,mesos-master-2:2181,mesos-master-3:2181/mesos”
Use this script to setup these files:
echo "zk://mesos-master-1:2181,mesos-master-2:2181,mesos-master-3:2181/mesos" > /etc/mesos/zk
echo 2 > /etc/mesos-master/quorum
echo $HOSTNAME | tee /etc/mesos-master/hostname
ifconfig eth0 | awk '/inet addr/{print substr($2,6)}' | tee /etc/mesos-master/ip

# make sure mesos-slave won't be running on master
echo manual | sudo tee /etc/init/mesos-slave.override
- Configure Marathon Framework (on every Master node)
Use this script to setup related files:
### auto-script
mkdir -p /etc/marathon/conf
echo $HOSTNAME | tee /etc/marathon/conf/hostname
echo "zk://mesos-master-1:2181,mesos-master-2:2181,mesos-master-3:2181/mesos" | tee /etc/marathon/conf/master
echo "zk://mesos-master-1:2181,mesos-master-2:2181,mesos-master-3:2181/marathon" | tee /etc/marathon/conf/zk
- Configure Mesos Slave service(on every Slave node)
Use this script to setup slave’s ip & hostname.
# Make sure zookeeper won't be running on slave
sudo stop zookeeper
echo manual | sudo tee /etc/init/zookeeper.override

# Make sure mesos-master service won't be running on slave
echo manual | sudo tee /etc/init/mesos-master.override
sudo stop mesos-master

ifconfig eth0 | awk '/inet addr/{print substr($2,6)}' | tee /etc/mesos-slave/ip
echo $HOSTNAME | tee /etc/mesos-slave/hostname
- Run Mesos Master & Slave services
On master nodes, bring up 3 services: zookeeper, mesos-master, marathon
# for master nodes
restart zookeeper
start mesos-master
start marathon
On slave nodes, bring up 1 service: mesos-slave
start mesos-slave
D. Run a task
Create a marathon task definition json file like this. This task execute the echo Hello World command, then sleep for 10 seconds.
$ mkdir def-tasks
$ vi ./def-tasks/task-hello.json
{
    "id": "helloworld",
    "cmd": "echo \"Hello World\"; sleep 10",
    "mem": 32,
    "cpus": 0.3,
    "instances": 2,
    "disk": 0.0,
    "ports": [0]
}
submit this task to cluster:
curl -i -H 'Content-Type: application/json' -d@./def-tasks/task-hello.json mesos-master-1:8080/v2/apps
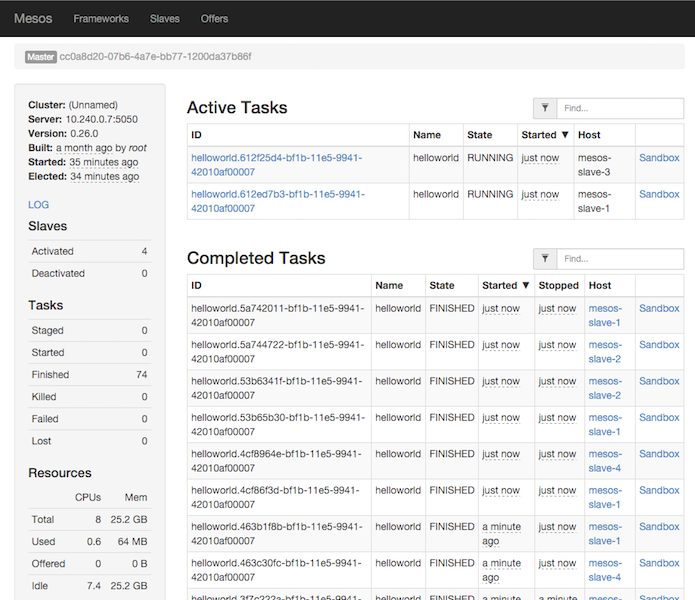
Monitor the tasks in mesos cluster, navigate your browser to: http://mesos-master-1:5050/

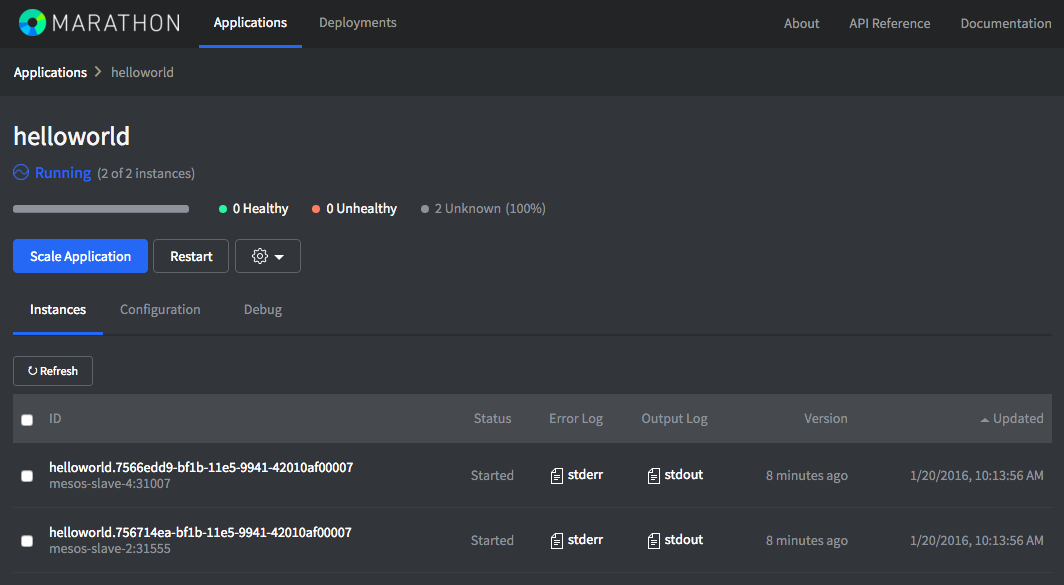
Monitor the tasks in Marathon, navigate your browser to: http://mesos-master-1:8080/
